Q. How are the Batteries Installed ?

Detailed Instructions for Initial Installation of Batteries

1. To remove Battery Cover, press down at the arrow mark and also on the center of the cover, SLIDE it in the direction of the arrow as shown in Figure 1.
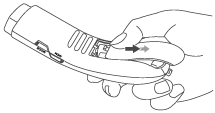
Figure 1

Figure 1


2. Install (2) AA Aikaline batteries with polarity as shown in the battery compartment. All LCD display segments will briefly illuminate during self-test, and you will hear a "beep".


3. Close the battery cover by pressing down both the arrow mark and the bottom of the cover, SLIDING the cover in the opposite direction of the arrow as shown in Figure 2.

Figure 2

Figure 2


4. Do NOT press the battery cover to force it closed if the battery cover doesn't close tight as shown in Figure 3. If this happens, remove the battery cover by SLIDING as described in step 1. Repeat step 3 to close the battery cover tight.

Figure 3...Caution: Closing the battery cover by force may damage the battery cover latch and result in battery damage. Always follow the instructions and close the battery cover by SLIDING only.

Figure 3...

Caution: Closing the battery cover by force may damage the battery cover latch and result in battery damage. Always follow the instructions and close the battery cover by SLIDING only.


5. If thermometer wiII be stored for a long period, remove batteries. SET date and time as described In Setting Date and Time.  Caregiver defaults to °F temperature scale and BODY Mode

Q. Is it Possible to Adjust the Calibration of Caregiver?

Caregiver thermometers are factory calibrated to standards as specified by ASTM standard E1965-1998 and normally require no adjustment by the user.  For users with precision calibration equipment designed to calibrate infrared thermometers, it is possible to trim the calibration settings if they find it necessary to restore factory specifications.

Q. How Does the Caregiver Work?

A. The Caregiver reads the infrared energy from the mid-forehead and converts it to a meaningful body temperature using a proprietary algorithm.  The thermometer never touches the patient.  The sensor end is held from 1/2" to 2" away from the mid-forehead and the temperature is displayed in 1 to 2 seconds after the operator presses the START button.

Q. How do I Clean or Disinfect the Caregiver?

A.  The plastic housing and sensor may be cleaned as detailed below.


Storage

Store in a dry location free of dust and away from direct sunlight.

The sensor cap is provided to keep dust and contaminants from entering the waveguide.   Always replace the sensor cover if dust or contaminants are likely to enter the waveguide or during prolonged periods of non-use.  If these issues are not present, the sensor cap may be left off between readings.


Cleaning the Thermometer Plastic Housing

Replace sensor cap and use a soft dry cloth to clean the plastic housing or a cloth dampened with a solution of water and mild detergent.

70% isopropanol solution or wipes having 70% isopropanol  may be used.   Be sure thermometer housing is dry prior to use.

Never submerge in liquid.

Alternative Disinfectant Products

The above procedure is the preferred method to clean Caregiver.  The following products, if approved by your healthcare facility, may also be used.  However, extra care should be taken as follows:

Use only on the plastic housing, not on the "sensor waveguide" as pictured below.

Use these products as directed on the product labeling.

Remove any residue remaining after cleaning.

Use sparingly to avoid any liquid ingress into the case in the vicinity of the blue buttons and the sensor waveguide.

Let dry completely.  Insure there is no residual moisture on the case prior to taking temperatures.

Clorox Healthcare Bleach Germicidal Wipes

Sani-Cloth® AF3 Germicidal Disposable Wipes


Cleaning the Infrared Sensor

The infrared sensor is recessed about 1 inch from the front of the instrument which makes it less likely that contaminates will enter the waveguide (Figure 1).  Always replace the sensor cover if dust or contaminants are likely to enter the waveguide or during prolonged periods of non-use.

Figure 1.

Figure 1.

Should contaminates enter this area, clean with a low-lint swab and gently wipe the sensor lens as shown in Figure 2.

Wait 10 minutes prior to taking a temperature.

Figure 2.

Figure 2.

Figure 3.

Figure 3.

A suitable swab is the QOSMedix.com Model 10222 Tightly Wound Point Tip Swab available from your dealer or Thermomedics. (Figure 3)

WARNING: DO NOT immerse or soak Caregiver  in any type of fluid.

WARNING: DO NOT use steam, heat or gas sterilization on the thermometer . 

DO NOT autoclave the thermometer.

Open/Download PDF of Cleaning Instructions in a new window

Q. Can You Provide a Detailed Description of MODES in the Caregiver Thermometer?

A. SUMMARY of MODES

The Caregiver thermometer's primary function is clinical fever thermometry. In BODY mode, it produces a temperature equivalent to an internal body temperature (sublingual for adult subjects) by measuring the external skin temperature in the forehead area and applying a mathematical algorithm.

In addition to BODY mode, Caregiver has 2 special purpose modes which are accessed by successively pressing the MODE button. These MODES are ROOM temperature and SURFACE temperature and are explained below.

BODY TEMPERATURE MODE

image

image

BODY mode is the DEFAULT mode of Caregiver. Each time the thermometer is turned ON from a power OFF state by pressing the POWER/START button, the Caregiver is in BODY mode.

image

image

In this MODE, the BODY icon will be displayed in the LCD.

When Caregiver goes into the sleep state, approximately 1 minute after no user activity, the LCD will momentarily display "OFF" and then go blank. When Caregiver is next powered ON, it will be in BODY mode. This feature, assures that the thermometer is not accidently left in a special purpose mode.

Each depression of the POWER/START key will result in a new BODY temperature being displayed. The last 10 temperatures are held in MEMORY for later recall using the MEM key.

SURFACE TEMPERATURE MODE

SURFACE mode is a special purpose mode which has 2 functions :

· Non-contact object temperature

· Calibration Check

To place Caregiver into SURFACE mode, press the POWER/START key to wake up the device, then press and hold the MODE key until the current MODE icon is displayed.  Repeatedly press MODE until "SURFACE" displays on the LCD. Caregiver will stay in SURFACE mode until the user presses the MODE key or the device goes into the SLEEP state at which time it will go onto the default BODY mode.

Successive presses of the POWER/START key will result in new SURFACE temperatures being displayed. The last 10 temperatures are held in MEMORY for later recall using the MEM key.

NON-CONTACT OBJECT TEMPERATURE

In SURFACE mode, the temperature of the surface of many objects may be measured without touching the object. For example, the temperature of a baby's formula may be measured by pointing Caregiver at the bottle in SURFACE mode and pressing the Power/Start key.

The temperature is less accurate when measuring metallic or shiny objects. (These objects have surface emissivity significantly below 1.0)

The sensor in Caregiver has a field of view of 16° full cone angle as shown in the figure. (The sensor element is recessed approximately 1" from the end of the thermometer.) This applies to BODY and SURFACE modes.

image

image

At 1" from the end of the thermometer, it will measure the temperature of a circle of 0.56" (1.4 cm) diameter. At 2" away, it will measure the diameter of a circle of 0.84" (2.1 cm), etc.

CALIBRATION CHECK

Some healthcare facilities with biomedical departments check the calibration of their various devices typically every 6 months or annually. This may be accomplished with Caregiver in the SURFACE mode. Caregiver is factory calibrated in SURFACE mode with a national Standards traceable blackbody source to the ASTM E1965-1998 standard [1]. This standard calls for a blackbody source of emissivity greater than 0.99 immersed into a stable waterbath. The equipment required is explained in the standard.

Standalone Caregiver blackbody source calibrators that do not require a waterbath may also be available.  Contact Customer Service for availability.

If a re-calibration is necessary, this may be accomplished by placing the thermometer in the CAL mode.  CLICK CALIBRATION tab in the Knowledge Base instructions on the re-calibration method.

ROOM TEMPERATURE MODE

ROOM Temperature MODE is the other special purpose mode. 

To place Caregiver into ROOM mode, press the POWER/START key to wake up the device, then press and HOLD MODE until the cuurent MODE icon is displayed.  Repeatedly press the MODE key until the word ROOM appears on the LCD.  Caregiver will stay in ROOM mode until the user presses the MODE key or the device goes into the SLEEP state at which time it will go into the default BODY mode.  Successive presses of the POWER/START key will result in new ROOM temperatures being displayed.  The last 10 temperatures are held in MEMORY for later recall using the MEM key.

The ROOM temperature displayed is the approximate temperature of the room that the thermometer is placed in.  The ROOM temperature sensor is deep inside the instrument so there is a delayed response if the room temperature is suddenly changed.  Once stable, the accuracy is approximately 1°F (0.5°C).

References

[1] ASTM E1965-98, Standard Specification for Infrared Thermometers for Intermittent Determination of

Patient Temperature

Q: What are Average Normal Temperatures at Various Body Sites?

A. Normal temperature ranges by site:

Axillary

94.5 – 99.1 °F 34.7 – 37.3 °C

Oral

95.9 – 99.5 °F 35.5 – 37.5 °C

Rectal

97.9 – 100.4 °F 36.6 – 38.0 °C

Ear

96.4 – 100.4 °F 35.8 – 38.0 °C


1. Chamberlain, J.M., Terndrup, T.E., New Light on Ear Thermometer Readings, Contemporary Pediatrics, March 1994.

2. Chamberlain, J.M., et al., Determination of Normal Ear Temperature with an Infrared Emission Detection

Thermometer, Annals of Emergency Medicine, January 1995.

Q. What is the sensor field-of-view (FOV) of Caregiver?

A. The sensor in Caregiver has a field of view of 16° full cone angle as shown in the figure. (The sensor element is recessed approximately 1" from the from the end of the thermometer.) This applies to BODY and SURFACE modes.

clip_image002

At 1" from the end of the thermometer, it will measure the temperature of a circle of 0.56" ( 1.4 cm) diameter. At 2" away, it will measure the diameter of a circle of 0.84" (2.1 cm) , etc.

Q. I See One of the Following Error Codes on the LCD "LO HI E1 E2 E4 E5". What does it mean?

A. Error or Warning Codes may be diplayed on the LCD.  Here is the interpretation:

Warning and Error Codes

E1- The operational (ambient) temperature is BELOW specification range

E2 – The operational (ambient) temperature is ABOVE specification range

E4 – Sensor / circuit error (usually, this means the device needs to be repaired)

Lo – The temperature of the subject is BELOW specification range

Hi – The temperature of the subject is ABOVE specification range

E5 – Low Battery, needs to replace batteries immediately.  (Device will switch to sleep mode after 3 beeps.

There is no E3 error code.